Astrophotography is a fascinating and rewarding hobby that lets you to capture stunning images of the night sky. Whether you’re an amateur astronomer or simply someone who enjoys stargazing, taking your first astro-photo is an unforgettable experience. The feeling of awe and wonder is something that will stay with you for the rest of your life. You’ll never look at the night sky the same way ever again.
In this blog post, we’ll discuss some tips and techniques to help you capture your first stunning astrophotography image.
The Equipment
There is a misconception that you need to spend thousands on professional gear before you can start to capture wonderful photos of the universe. The reality is far from it. Below is an image of my first ever astro-photo. It was taken on an iPhone 12 Pro, using a cheap phone tripod and a 30 second exposure timer.
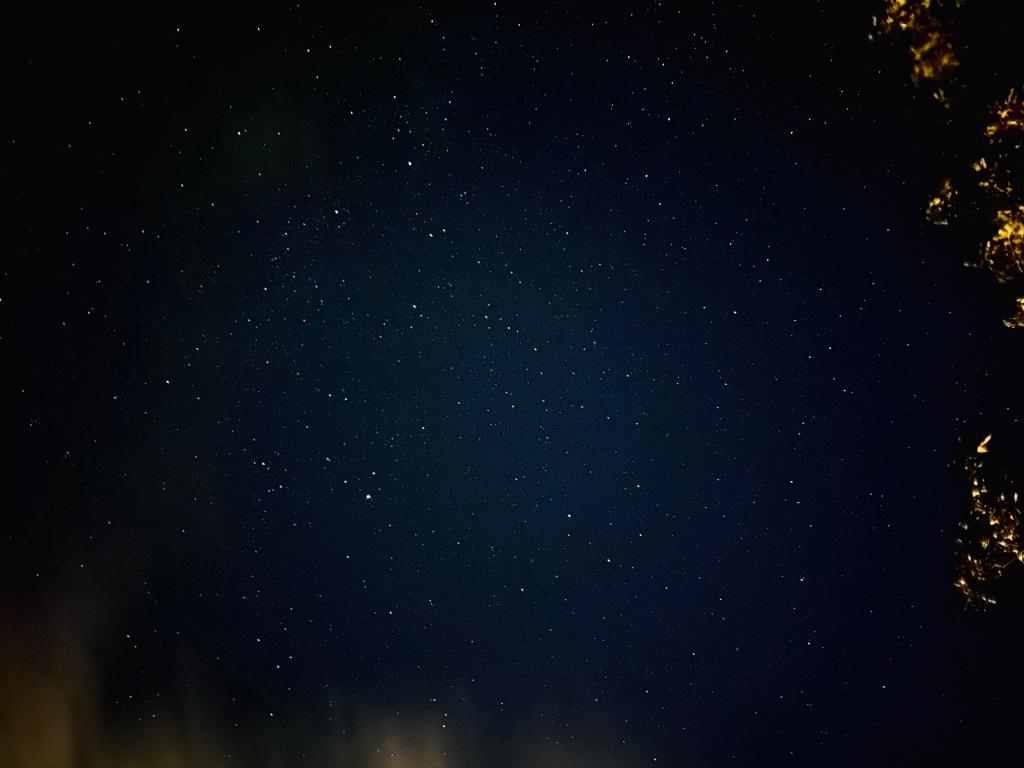
Starlights – iPhone 12 Pro – Single 30 second exposure
The image above was taken during August 2020. With my dad and brother, looking up at the sky, we could only make out 10-15 stars with the naked eye. I thought it would be interesting to capture the scene with the clouds drifting by, but when the exposure completed and the image displayed on the screen, I was absolutely blown away! This tiny smartphone camera was able to capture thousands of stars in a sky where I could only see a fraction of them. The camera was capturing details I was unable to see by myself. From that moment on, I was hooked! Although it’s tough to believe, astrophotography is more about how it makes us feel rather than the end result. The image is still important – but it’s about the emotions you feel whilst capturing and processing it!
Before you can start taking astrophotography images of deep sky objects, you’ll need to invest in some basic equipment. First and foremost, you’ll need a camera capable of taking long exposures. A DSLR or mirrorless camera is a good choice, as they allow you to adjust key settings like the aperture, shutter speed, and ISO. You’ll also need a sturdy tripod to keep your camera stable during long exposures, and a remote shutter release to minimize camera shake.
Choose the Right Location
Finding the right location for astrophotography isn’t as important as you might think. You’ll want to find a spot that is far away from city lights, as light pollution can interfere with your images. Look for a dark sky area where the stars are visible, and try to avoid areas with trees or other obstacles that may block your view of the sky. However, if you can’t, there’s no reason to worry. As long as you have a view of the sky, you can make use of light pollution filters to block out unwanted light from street lights and nearby cities. Every image I’ve captured has been right from my back garden at home.
Decide what you want to image
Once you’ve found the right location, it’s time to plan your session. For deep sky objects, you’ll want:
- A focal length around 150mm or above. This allows you to zoom in and magnify deep sky objects
- A star tracker. Because the Earth is moving, at longer focal lengths, stars will begin to streak across the image during long exposures. Star trackers move in the opposite direction of the Earth, keeping your camera locked onto the same point in the sky all night long, allowing for sharp images and pinpoint stars.
- Lens heater – This wraps around the lens and keeps it warm, preventing condensation from forming throughout the night.
- Intervalometer – This allows you to control the camera without touching the body, minimising vibrations.
Camera Settings
Configuring your camera is vital in making sure your exposures are correct. We want the sensor to collect plenty of light without washing out the image. You’ll want to set your camera to manual mode, and adjust the aperture, shutter speed, and ISO to capture the best possible image. For most deep sky objects, the following settings will be a great starting point:
- Exposure time/Shutter speed: 120 seconds. This is long enough for the sensor to collect plenty of light, but short enough where any tracking errors in most star trackers should not be visible.
- Aperture: f/2.8 – 4 – A wide aperture will maximise the light gathering ability of your lens
- ISO: 800 – This one is subject to lots of controversy. Some prefer a higher gain, others lower. It often depends on what model of camera you’re using, but I’ve always preferred lower ISO settings as this helps reduce the overall grain and noise in the final image.
Polar Alignment
Polar alignment is extremely important in astrophotography because it allows your telescope to accurately track the apparent motion of the stars across the sky, resulting in clear and sharp images.
Your camera needs to be able to follow the rotation of the Earth so that the stars appear as pinpoints of light instead of blurry streaks. Although the star tracker will handle this for you, it still needs to be aligned with the rotational axis of the Earth. This is known as Polar Alignment – find out more here!
Framing your target
Astrophotograhy is no different to street, nature or portrait photography – all require preparation, planning, and framing. However unlike conventional photography where your subject is clearly visible, most deep sky objects are too far away to be seen by the naked eye, which makes framing a big challenge for beginners. Something I use to help with this is planetarium applications. These applications show you what will be in the night sky on a particular day and time. My favourite option is Stellarium, as it allows you to overlay your own garden or home to plan ahead for any obstructions. See below:
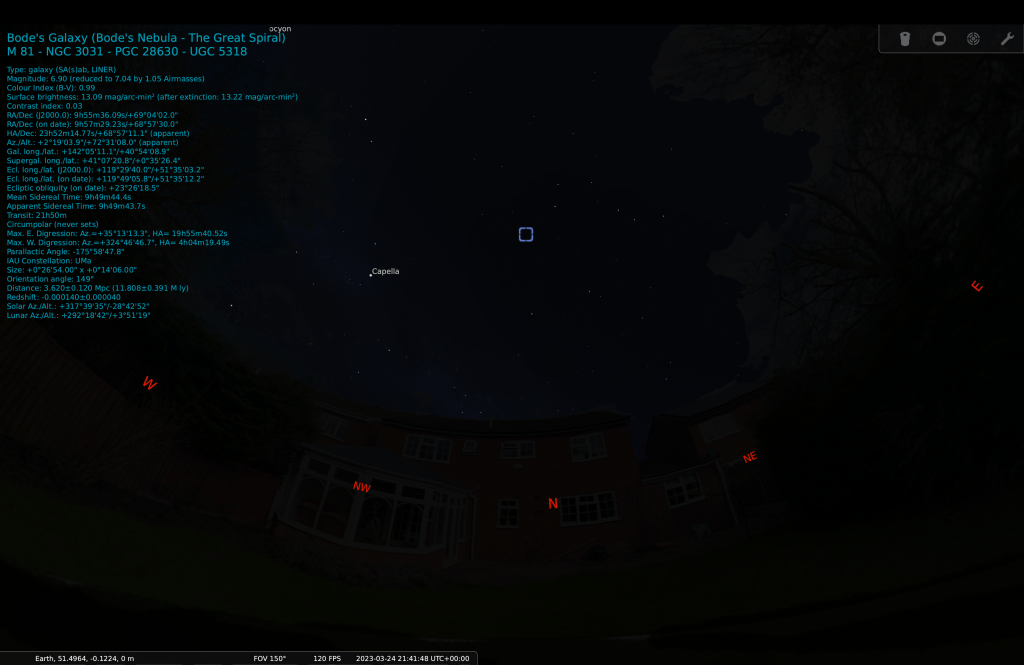
My home and garden overlayed in Stellarium
From the image above, I can clearly see what my target, Bodes Galaxy, will be high in the sky and would have cleared the roof of my house. It also shows me exactly where in the sky it will be!

Zooming in, Stellarium also provides the option to input the sensor size of your camera and focal length of your lens or telescope. From here, it will show you just how big the object will be in your image frame. You also have the option of rotating the frame to try different framing options!
Positioning your Camera
Once you know what framing you want to achieve, it’s time to point your camera at the right area of the sky! If you’re using a simple star tracker, you’ll need to do this manually. This can be challenging for those unfamiliar with star patterns, but, in short – you’ll need to look at the star patterns in Stellarium, and use those as a guide. You will have to position your camera, take a short test exposure, and keep re-positioning until you get the target in your field of view. However, if you’re using a mount that has go to functionality, it should be as simple as selecting the target in the hand controller, and the mount will automatically slew to the correct part of the sky!
Collecting your Sub-frames
Sub-exposures refer to the individual frames or images that are taken by a camera during a long exposure astrophotography session. Rather than taking a single long exposure, it’s better to take multiple shorter exposures, which are then stacked and combined to create the final image.
It also allows you to reduce noise and improve image quality. When taking long exposures, the camera’s sensor can become hot, which can introduce noise into the image. By taking several shorter exposures, the sensor has time to cool down between shots, reducing the amount of noise that appears in the final image.
Taking multiple sub-exposures makes it easier to capture faint details in the night sky. By taking multiple shorter exposures, astrophotographers can collect more light from distant objects like galaxies and nebulae. When these shorter exposures are combined, the faint details become more visible. They help to minimise the effects of tracking errors and satellite trails running across your frames.
Processing your Images
Once you’ve taken your sub-exposures, it’s time to stack them together. There are many different types of software available, however the most beginner friendly option (and it’s also very good..!) is DeepSkyStacker. The program will take your individual sub-exposures, and stack them all together by aligning the stars. You can also tell it so only stack the best 90% to ensure any images with blurry stars or clouds are excluded. DSS will then output a single TIFF file for you to process in the photo editing suite of your choice. Most use Adobe Photoshop or Pixinsight.
Taking your first astrophotography image can be a daunting experience, but one that is incredibly rewarding. There is nothing more satisfying than working hard to understand and use the equipment you have, and capture the Universe in a way you’ve never seen it before. By careful planning and taking your time, you can capture stunning images of the night sky that will amaze and inspire others. So get out there, and start exploring the wonders of the universe through your camera lens! Soon you’ll be ready to upgrade to something like this…!

