Astrophotography is all about capturing the night sky. This can mean breathtaking wide-field shots of the Milky Way galaxy or zooming in on deep sky targets like individual galaxies and nebulae. The last thing you want to do is rush into making a purchase that you regret, and if your passion is strong enough, it will carry you through the steep learning curve involved in astrophotography. You can choose a zoom lens and build your set-up slowly, or you can choose a dedicated imaging telescope. Let’s explore this in more detail:
If you’re anything like me, you’ll love anything that involves the night sky. However you may have an interest in a particular type of imaging. For instance, the photography equipment required to capture beautiful landscape shots of the Milky Way is very different than what’s needed for stacking long exposure images of deep sky targets like galaxies and nebula. Let’s have a look at the 2 key types of astrophotography and the required equipment below. This will give you an idea of what you’ll need:
1. Wide-Field Astrophotography
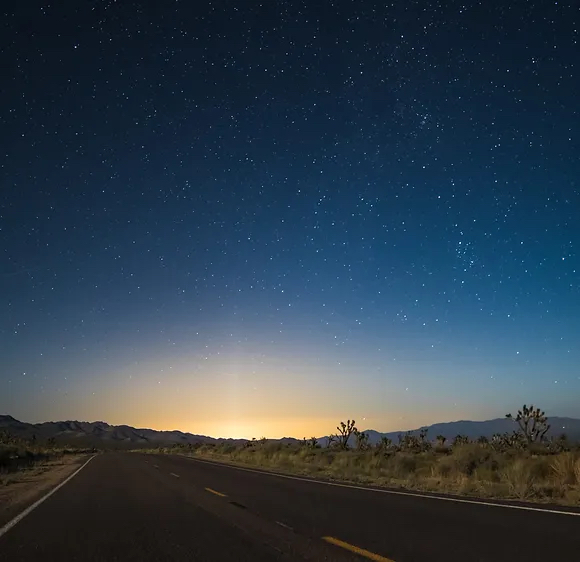
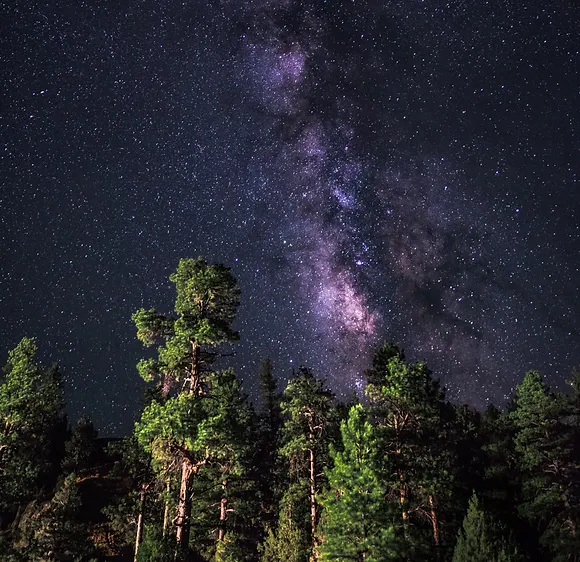
Wide-field astrophotography is perhaps the most popular style of imaging when it comes to capturing the night sky. Most astro images on social media are exactly this. Whether it’s a shot of the Milky Way rising over the alps or total lunar eclipse in field of flowers, landscape astrophotography provides an unmatched perspective of our home amongst an endless ocean of stars. It just so happens that landscape astrophotography can be done with nothing more than a DSLR camera and a tripod!

Equipment Required for Wide-Field Astrophotography
Wide-field astrophotography can be done with nothing more than:
1. A DSLR Camera
2. A lens
3. A tripod or tracking mount.
You’ll probably already have a DSLR and lens at home, but if you don’t, you don’t need to break the bank. Something simple like a Canon EOS 1300D and a wide angle lens like the Rokinon 14mm f/2.8 will collect lots of light very quickly over a very wide field of view.
You can now use a simple tripod to keep the camera stable and start taking exposures. Because the Earth is rotating, long exposures will result in star trails and blurry images, so using just a simple tripod, you’ll be limited to exposures of just a few seconds. These can still capture great detail, you’ll just need to take more of them. However, in order to take longer exposures and capture more fainter details in your wide field shots, you’ll need a tracking mount. A tracking mount will move the camera in the opposite direction of the earths rotation, allowing for much longer exposures without any star trails!
Tracking mounts will definitely provide the best experience however. It may be tempting to just stick with a tripod, and there is nothing wrong with that! But if you wanted a true taste of the hobby, it’s hard to beat a tracking mount. They will allow you to gain experience in polar alignment, allow for longer exposures and better images, and are a very good way to get a true flavour of the hobby. The Sky Watcher Star Adventurer and the iOptron Sky Guider Pro are great introductory tracking mounts!
The Skywatcher Star Adventurer Star Tracker
Star Trackers are similar to full fledged equatorial mounts, except they’re much smaller, have lower payload capacities, and they only track the sky in one axis. This often causes initial confusion to beginners – but when you think about it, the Earth (and therefore sky) only move in one direction – from east to west.
This is why polar alignment is so important when using a star tracker. They only move in one axis. If your polar alignment is poor, there will be drift in the second (up/down) declination axis. Star trackers also don’t have any GoTo functionality so you will need to manually locate and frame your target.
Related article: What is Polar Alignment
Full equatorial mounts (see below) are heavier, have much more payload capacity, but most importantly, they have motors for both the Right Ascension and Declination axis. Therefore, even if your polar alignment is poor, auto-guiding can be used to provide corrections for both axis.
Related article: What is auto-guiding
2. Deep Sky Astrophotography
If you’ve taken a look at my portfolio then it will be clear what style of astrophotography I prefer! Deep sky photography has always fascinated me. The thought of capturing distant objects like galaxies with a chance that someone else could be looking back and taking a photo of our own milky way was indescribable. There could be billions of worlds and civilisations in just one photo like this!

Equipment Required for Deep-Sky Astrophotography
Deep-sky astrophotography means zooming in on objects much further away and will require more equipment:
1. A Camera (DSLR or dedicated astro camera) – astromodification recommended
2. An equatorial tracking mount
3. A guide scope and guide camera – optional but highly recommended
4. Image control software – an intervalometer will do
5. An imaging telescope
6. Motorised focuser – optional

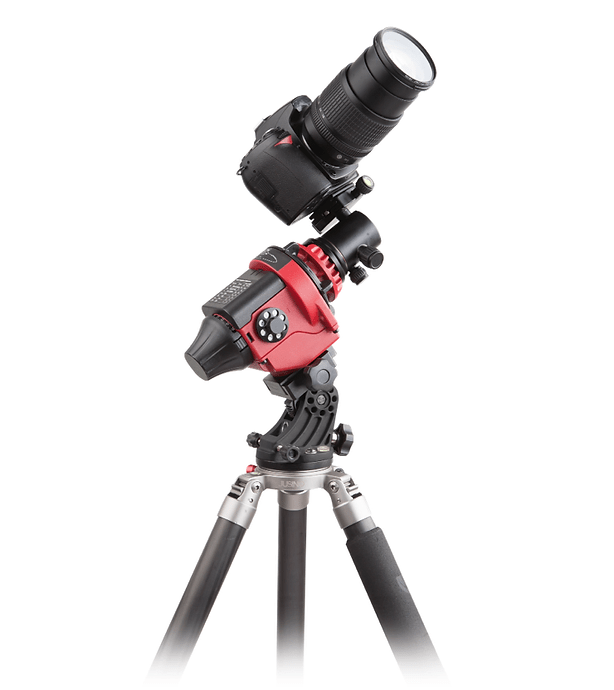
My Skywatcher EQ6-R equatorial mount, telescope, guide scope and cameras
Let’s break this down a little more:
The Camera
As mentioned above, something simple like a Canon EOS 1300D, or any other DSLR you have at home will be perfectly fine for broad spectrum targets like galaxies and star clusters. However, deep sky objects such as nebulae emit in different wavelengths of light, which are often blocked by internal filters in DSLR’s. Astro-modification is the process of removing these filters allowing your DSLR to capture this light. Learn more by clicking here. In the image above, a dedicated astronomy camera is used – the ZWO ASI294 MC PRO. Dedicated astronomy cameras have two key benefits:
- There are no filters, so they are able to capture the full spectrum of light emitted by objects in deep space.
- They often come with Thermo-electric Peltier Coolers built in. These are specialised micro-coolers that bring the temperature of the sensor down to -20 °C or lower. This has the HUGE benefit of reducing the amount of noise in the sensor, resulting in cleaner, noise-free images.
The Mount
A German Equatorial Mount is designed to track targets as they move across the sky. Instead of moving up/down and left/right like a typical camera tripod, an equatorial mount has a declination axis and a right-ascension axis. This allows the mount to move in a way that more naturally counters the Earth’s rotation. Remember, the stars don’t just move across the sky – they are rotating! Therefore the targets we are trying to photograph also appear to rotate as well. A standard tripod could follow the target, but wouldn’t be able to rotate with it. This is why an EQ mount is critical for long exposure astro-photography.
Guide Scope and Camera
Although not a strict requirement, a guide scope and guide camera are highly recommended. A German equatorial mount is very similar to a simple tracking mount – they both have motors that counter the Earth’s rotation. But nothing is mechanically perfect and the mounts will begin to drift. Wind, vibrations from nearby traffic, and imperfections in the mounts gearing can sometimes cause inconsistant or juddery movements, causing blurred images!
The guide scope and guide camera usually sit on top of your main telescope and camera. Auto-guiding software will take the feed from the guide scope and camera and lock into a star (or multiple) and monitor how they move. If the stars begin to drift, the auto-guider sends correction signals to the mount. This is called auto-guiding and it allows for very long exposures, sometimes up to 20+ minutes! Click here to learn more.
Control Software
Your image control software is the command centre of your imaging session. It operates your main camera, helps you plan your imaging sequences, interfaces with your auto-guiding system and if set up properly, can control your equatorial mount as well. Everything you need to control your imaging session can be done via your control software. There are several available – some paid, such as Astrophotography Tool or Sequence Generator Pro, and some free, such as Nighttime Imaging Ń Astronomy (NINA). If you’re using the ASIAIR, then it will come with it’s own operating system!
The Telescope
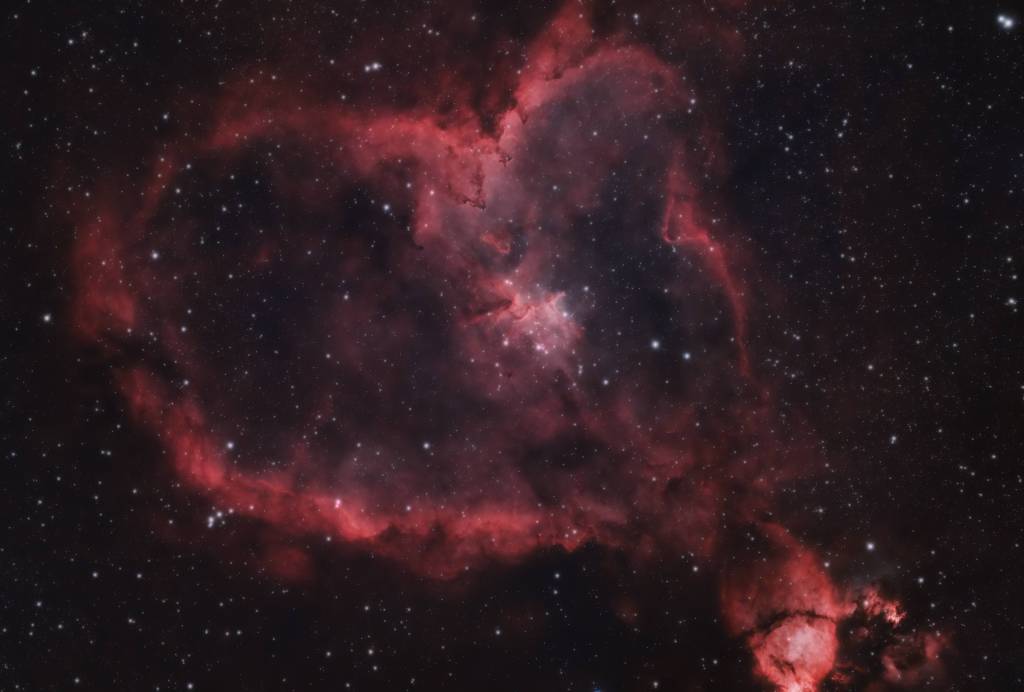
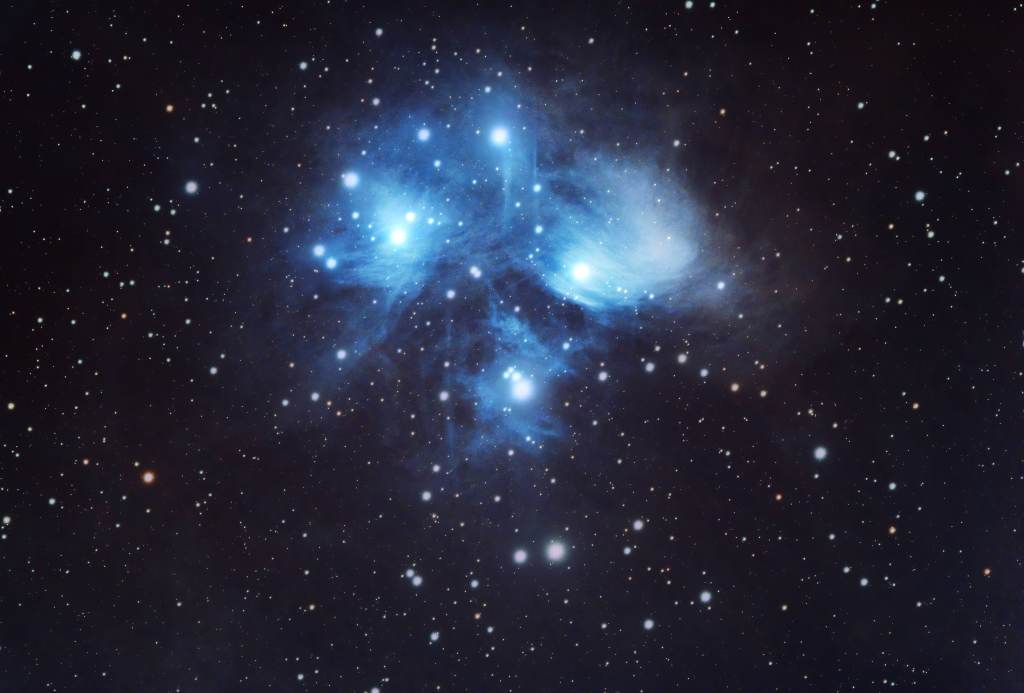
Imaging telescopes come in many different forms, but the most popular are reflectors and refractors. They also come in a range of focal lengths, so it’s important to make sure you know what targets you want to image before making any purchases. Most deep sky objects can be imaged comfortably around 500mm of focal length. I opted for a William Optics Star 73 – an apochromatic refractor with a focal length of 430mm. Below are some images I’ve taken with this telescope and an ASI 294 MC Pro camera!
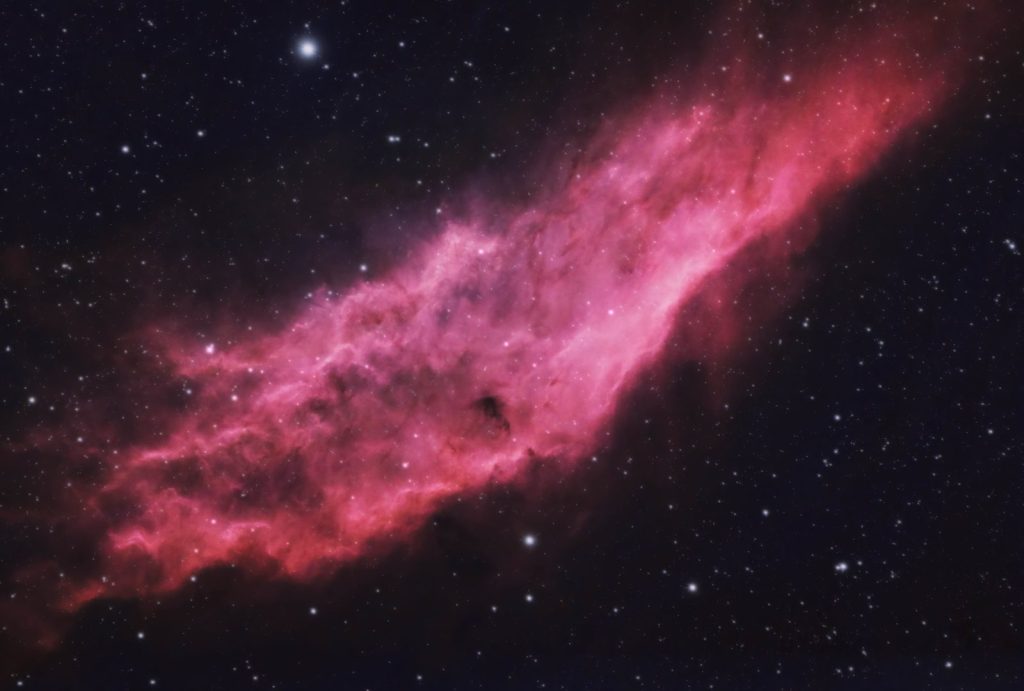
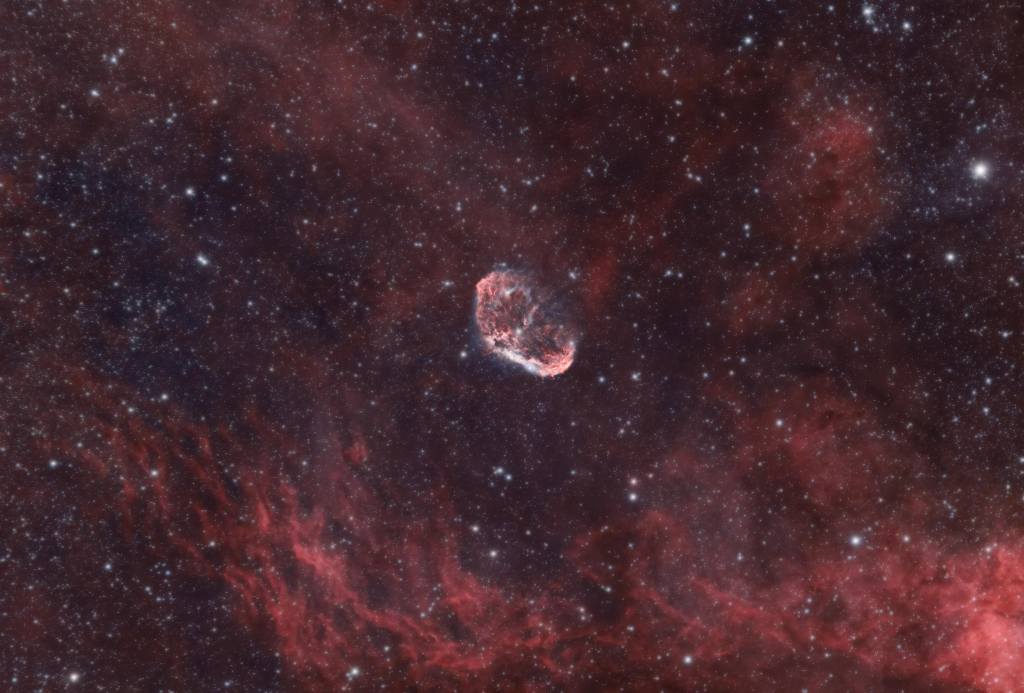

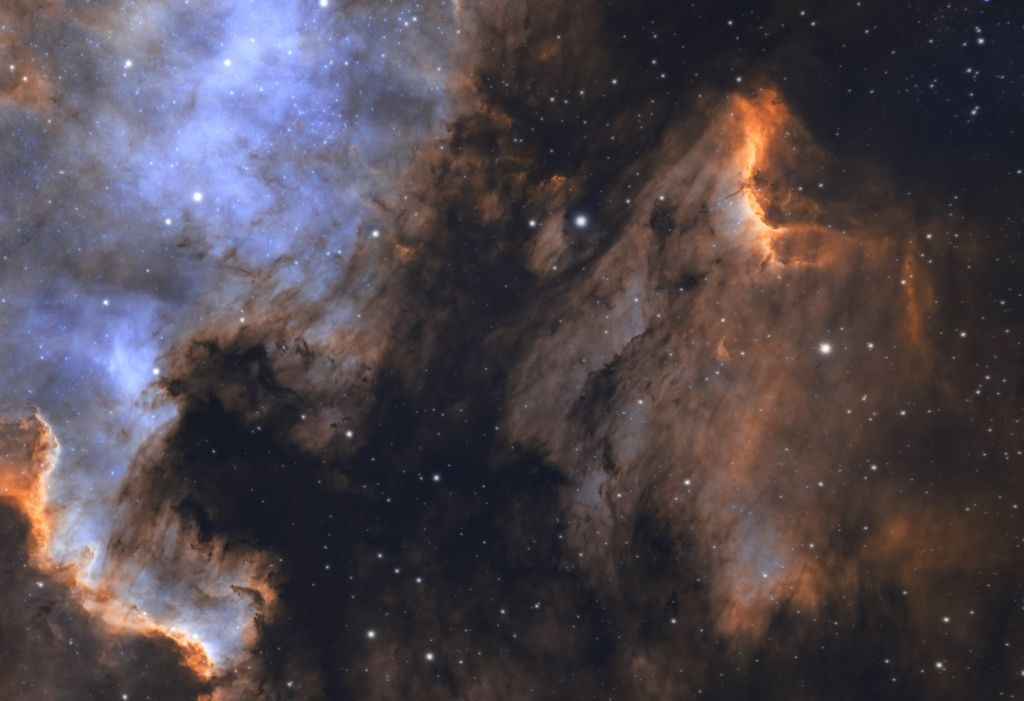
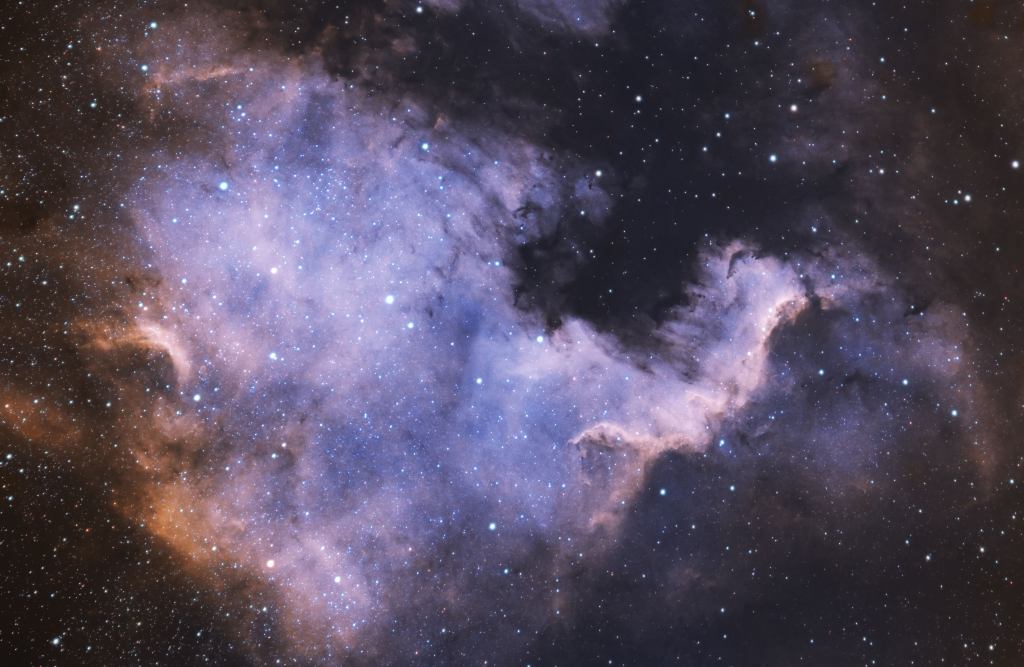
All images taken by me, using the William Optics Zenithstar 73 refractor and an ASI 294 MC Pro astronomy camera
If it’s small and distant galaxies you’re looking to photograph, then you’ll probably want something with at least 1000mm of focal length, probably even 1500+! In which case, something like the Celestron Edge HD series of Schmidt-Cassegrain reflectors will be suitable.
If you’re a beginner..
I want to take photos of deep space
If you’re a beginner looking to get involved with deep space photography, I would stick with wide field refractors around 200-500mm of focal length. At very long focal lengths, any issues with auto-guiding, gusts of wind, vibrations and issues with your mount are hugely magnified and will result in blurry images with star trails – a big source of headaches and frustrations.
Wide-field refractors are very forgiving – they have enough magnification to produce stunning images of the night sky (see above), but are wide enough where they are very beginner friendly and easy to use.
I want to take landscape milky way shots
If you’re looking to get involved in beautiful wide-angle milky way photography, I would recommend a simple star tracker, a DSLR and a wide angle lens. Some equipment lists are below:
Camera: If you have a full-frame camera, great! If not, almost any modern DSLR with an APS-C sensor will be suitable. Have a look at the examples below
EOS 1300D
EOS RP
Star Tracker:
Skywatcher Star Adventurer
iOptron Sky Guider Pro
