The golden question that had me going round in circles…
Choosing the right telescope to start your astrophotography journey is crucial. It can be the difference between an incredibly rewarding journey or being left feeling sour and short-lived. There are many different types of scopes available but for the purpose of “simplicity”, we’ll stick to the two most popular; Refractors and Reflectors. I’ll start out by saying that I think a small apochromatic refractor is the absolute best choice for a beginner. In this section we’ll delve into how they work, pro’s and cons, and my personal opinions. However, before this, we need to understand two basic concepts that govern all telescopes – aperture and focal length.
Focal Length & Aperture
It’s important to understand how the focal length and aperture of your telescope will affect the images you’re able to take. The aperture of your scope is the diameter of the objective lens – the wider it is, the more light that can enter the scope each second. The focal length is used to show the “zoom” capabilities of the scope. A higher focal length means the you’ll be much more zoomed in which is great for small targets like far away galaxies, but can make imaging big nebula a challenge.
Aperture – For astrophotography this isn’t too important. Because we’re taking multiple images and collecting light over a long period of time, aperture becomes less of a deciding factor for beginners. It’s still important because the wider the aperture, the more light collected per image. But it’s a far more important factor for visual astronomers who need the light instantly than it is for astro-photographers, who can get by with smaller apertures and stack hours of data to build their image.
Focal Length – this is the number what represents the amount of “zoom” a telescope has, or rather it’s field of view. For example, galaxies, although very big, are usually millions of light years away. To capture a galaxy properly, you want it to fill the frame. This can only be achieved by using a long focal length telescope. It’s worth noting that digitally zooming in on the image is not the same as optically zooming with a longer focal length. See the image below of M51 – The Whirlpool Galaxy. It was taken on a 430mm refractor. The galaxy is only a tiny spec in the frame! Something with 1500+mm of focal length would be a much better scope for a target so small.

Now that we’ve understood the key parameters, lets have a look at reflectors, refractors, how they work, and which one you should choose.
REFLECTORS
There are several types of reflectors available, but the most common is the Newtonian Reflector.
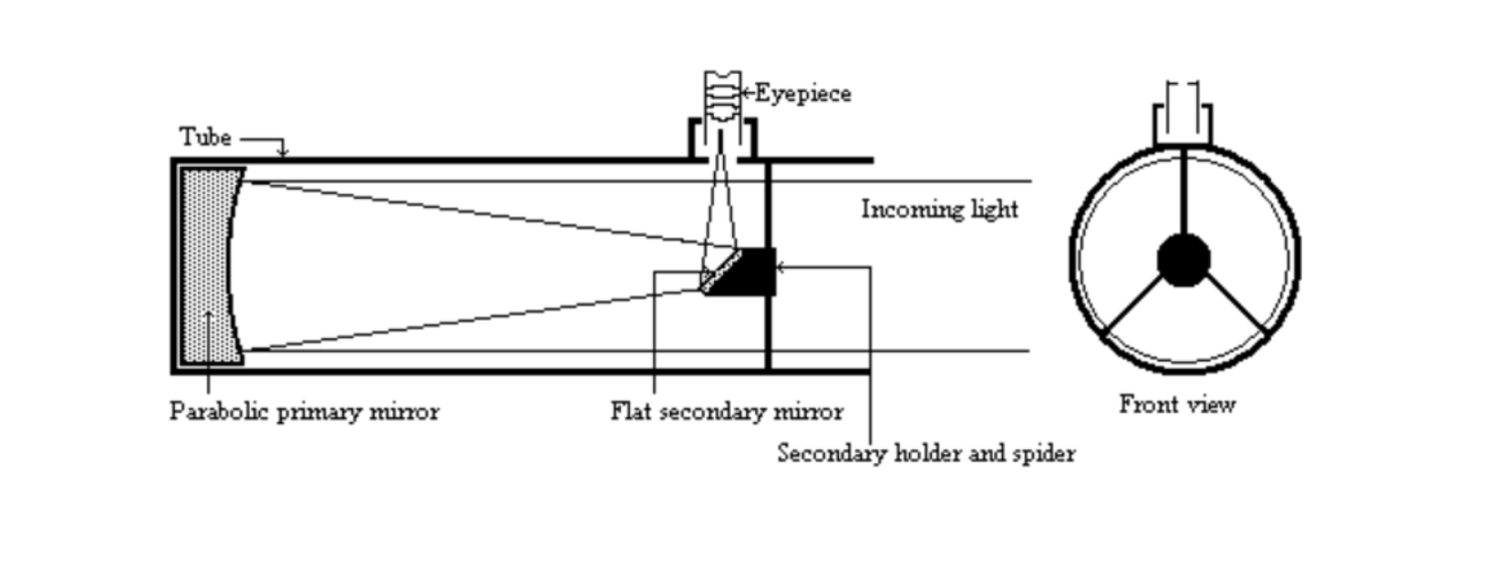
The Newtonian Reflector uses two mirrors – one parabolic, and another flat. They work by reflecting a large amount of light into a small area, increasing the density of photons, which results in a brighter and magnified image. Mirrors are also much cheaper to carve and produce than glass, which means reflectors can be had for a very modest price point.
Furthermore, because mirrors are more cost effective to produce, reflectors can be built with very large apertures, allowing them collect huge amounts of light in very little time. This makes them absolutely fantastic for visual astronomy, but when it comes to astrophotography, there are some setbacks to highlight:
- Collimation – Astrophotography is already complicated enough and adding additional steps doesn’t help. Collimation is the process of precisely aligning the primary and secondary mirrors to ensure the focal plane is in the correct place. Poor collimation can result in blurry images, out of shape stars and poor contrast. To make it worse, this needs to be done every time you move the telescope.
- The mirrors are open to the environment meaning they’re exposed to whatever elements are outside.
- Newtonians have big aluminium tubes that house the mirrors which can take a long time to cool down.
- Those big aluminium housings are heavy and have a huge surface area. They place a lot of strain on your mount, and small gusts of wind will have a big impact on your tracking/auto-guiding and will increase chances of blurry images.
REFRACTORS
Refractors on the other hand use glass lenses to focus the incoming light and produce sharp images with lots of contrast. Refractors come in two styles – achromatic and apochromatic. Apochromatic is what we want for astrophotography. Read on to find out more:
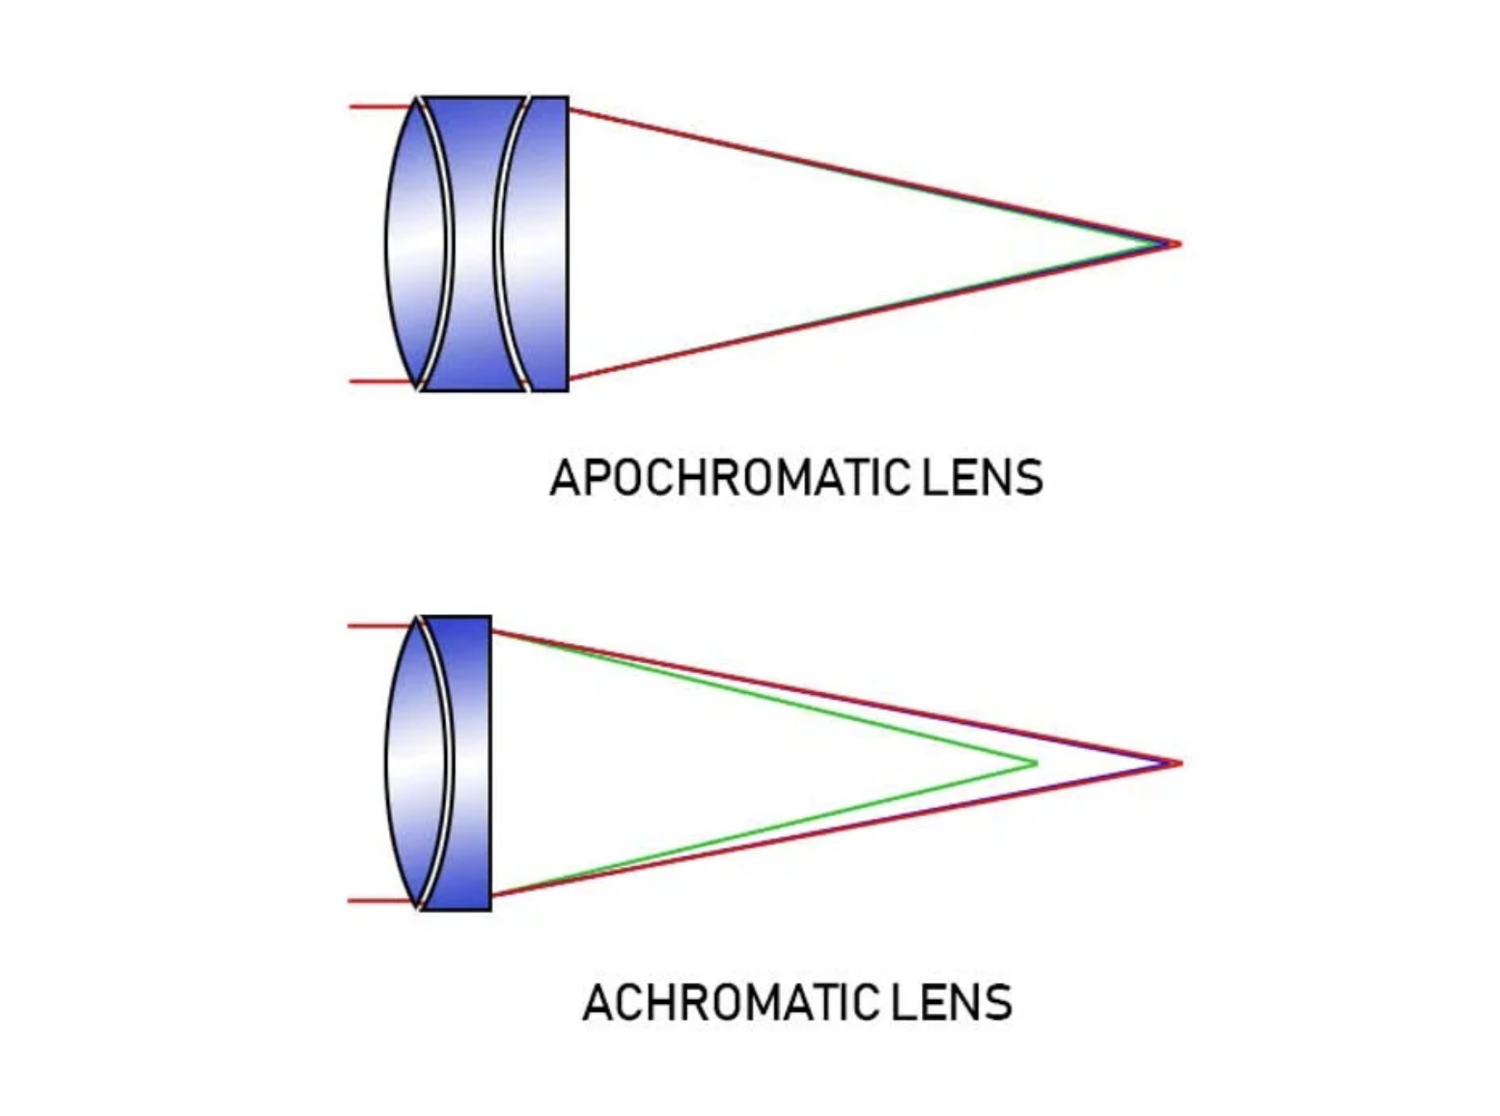
Above we can see images of two refractor systems; an achromatic and an apochromatic. The achromatic refractor doesn’t focus all wavelengths of visible light at the same point. This means the colours in your image will all be at different points of focus. The focal plane doesn’t vary by a huge amount, but it’s enough to visibly affect your images. Stars will have strange fringes around them and the colours in your image won’t have as much contrast, nor will they be as accurate. Although it’s possible, achromatic refractors are not designed for capturing photographs.
The apochromatic on the other hand uses additional lenses to precisely focus all colours to the same focal plane, resulting in a vastly superior image with better contrast, better focus, and more accurate colours. It takes a lot of fine tolerances to match multiple lenses up, which is the reason why apochromatic refractors usually cost a lot more. However, there are many key benefits of choosing an apochromatic refractor, especially for astrophotography.
Refractors are generally much lighter than Newtonian reflectors because they have much smaller apertures and therefore smaller body sizes. This can result in poor performance for visual astronomers, but for astrophotographers this isn’t a problem. Because we stack several images, we’re building up the data so we don’t need to see it all in one go. The smaller size also means less strain on the mount and better tracking performance.
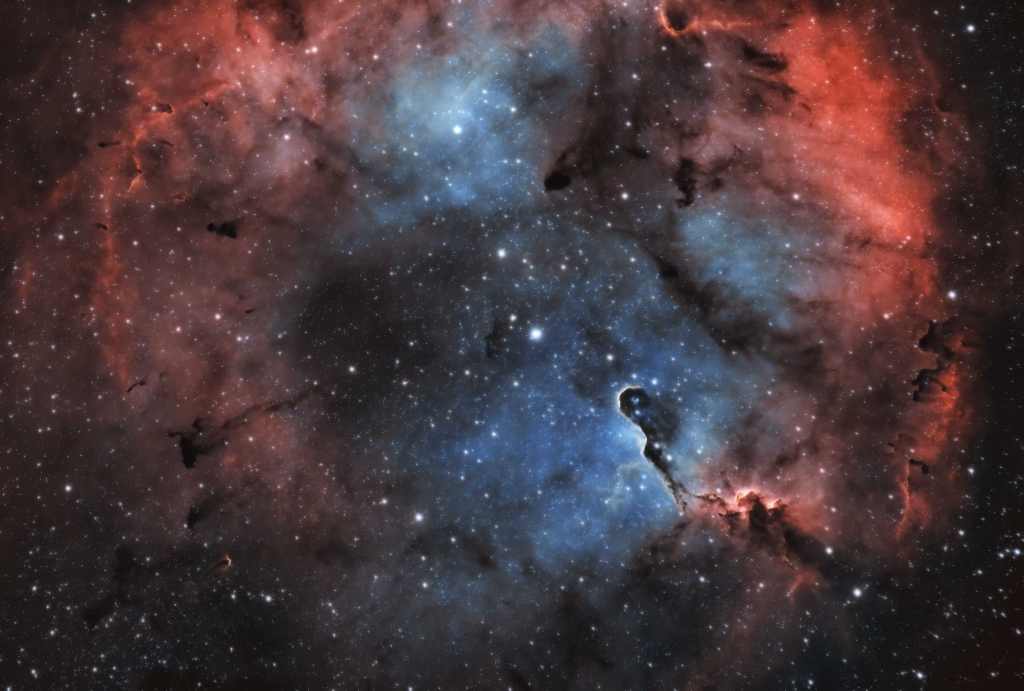
My goal was clear when I started this hobby – to produce the best deep sky images that my skills would allow. Whatever I would decide on, it had to be reliable, easy to use, easy to transport to a dark site if required, and produce sharp and colourful images. Have a look at the images below. All were taken on a William Optics Zennithstar 73 Apochromatic Refractor!
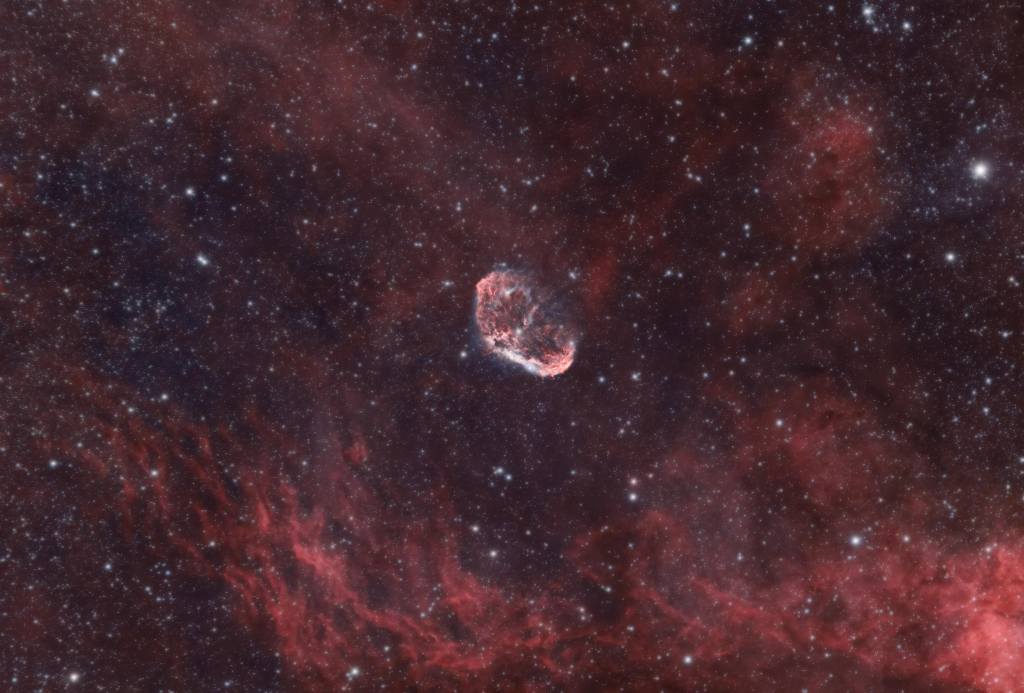

The Crescent Nebula
M81 & M82 Galaxy Pair
The Elephant’s Trunk Nebula
Key Factors to Consider
Reliability was a key factor in my decision. I needed something that would work consistently, night after night with minimum changes or fiddling. Astrophotography is a very technical hobby – there’s many things that can go wrong on the night and minimising this will increase chances of a successful imaging session. Refractors are a closed system – the optical glass is inside the tube and sealed from the outside world reducing the chances of things becoming out of place during transportation.
Ease of use was also an important factor. I wanted something that I could set up quickly with minimal maintenance. Refractors use optical glass lenses and work similarly to camera zoom lenses. This means things rarely need aligning or collimating like reflectors do.
Image Quality is a personal one but I absolutely hate diffraction spikes. Diffraction spikes occur due to the way in which Newtonian Reflectors are built. The structure that holds the secondary viewing mirror blocks incoming light, creating the spike patterns in the stars. This was an absolute no for me. The soft and natural stars offered by refractors is something that appealed to me much more.
Portability is also something to consider. Refractors are generally smaller than reflectors, making them lighter and easier to transport. It also means less load on your mount which can potentially improve the quality of your auto-guiding. Furthermore, due to their smaller size, refractors will have less drag in gusts of wind, minimising the effect of wind on your auto-guiding!
Related article: Auto-guiding
Price to Performance Ratio
If it isn’t clear, I’m a huge refractor fan. But it’s no secret – refractors are some of the most expensive types of telescopes available. They use glass lenses which are far harder to precisely grind and shape, and also have higher tolerances in the mating parts, driving up their cost.
Once you get past the 1000mm focal length mark, the price of refractors starts to become a little bit eye watering, and it may be worth switching to a different type of telescope, such as a Newtonian Reflector or a Schmidt-Cassegrain. The mirrors in a reflector are much easier to grind and shape, lowering the cost/focal length.
