Ensuring your frames are in focus is absolutely vital. Almost everything can be corrected in post processing, but out of focus frames are the one thing that cannot. Poor focus can ruin an entire nights worth of data and can be incredibly disheartening. Fortunately there are some very easy tools available to aid this process!
The Bhatinov Mask is perhaps the most important tool when focusing your camera and telescope. It’s so important that William Optics even built this mask conveniently into the telescopes cap!
When your telescope is pointed at a star with the bhatinov mask on the front, a set of diffraction spikes will be produced. This diffraction pattern provides a fantastic visual representation of your camera’s focus.
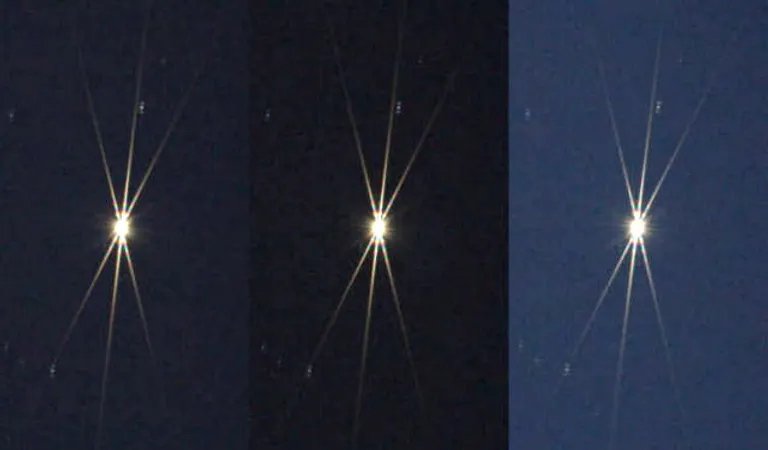
1. The central spike in this image is very slightly to the right. This is best seen by looking at the angles close to the centre of the star.
2. This image is perfectly in focus. The central spike is an equal distance from the two adjacent spikes.
3. The central spike is too far left. The differences can best be seen by looking closer to the centre of the star.
The image above shows the diffraction patterns that occur when taking a short exposure of the stars with the bhatinov mask on the telescope. It may look as if all 3 patterns look the same, but take a closer look…
Although these differences seem minor, they have a huge impact on the focus and quality of your light frames. Nothing can correct out of focus images so make sure to get the diffraction pattern as centralised as possible!
what about Auto-Focussing?
Firstly, it’s important to understand that auto-focus will not get you more accurate focus. Taking your time and using a bhatinov mask can achieve a very accurate focus by itself. The benefits of auto-focus all lie with temperature and automation.
As the temperature changes over the course of a night, so does your focus. All materials suffer from thermal expansion and contraction. This means the telescope tube, optical glass and even the rack and gears in your focus tube all contract as the temperature drops. This will change the focal plane of your system by a small amount. In the end you’ll notice the focus getting worse and worse with each frame you take. Sometimes it means a wasted night, and other times it’s unnoticeable. It all depends on how much the temperature changes. The focus will also naturally drift due to the weight off the camera and other accessories.
To mitigate these effects, all you need to do is refocus every hour or every degree change….he says so easily! This means you need to pause your imaging, refit the bhatinov mask, find the correct focus position, and restart your imaging. Doing this multiple times a night increases the risk of knocking your mount and affecting its polar alignment. Also, if it’s freezing, no one wants to keep going outside!
Enter the Auto-Focuser!
An autofocus motor fits on to your telescope and allows for precision motorised focusing. The auto focuser uses a stepper motor with reduction gears to amplify its torque output. This means it can very precisely move the focus to exact, repeatable positions every time. It also means it’s capable of lifting a heavy load! An autofocus motor can function in two ways:
1. You can use it to control your focus using a bhatinov mask. This means when you use the mask to focus using the diffraction spikes, instead of adjusting the focus wheel by hand, you can use the computer to move the focus motor by an exact precise amount. If you overshoot, it’s no problem – just return the motor back to its exact previous position. Trying to do this by hand is much more tedious because no matter how accurate you are, you’ll never be able to get things exactly where you want them by hand, let alone with any repeatable fashion!
2. You can use it for automatic focusing without the bhatinov mask. Auto-focus software can take photos of the stars, move the focus motor by a set amount, take another photo, and continue to do this until it finds the absolute best focus point. It does this by analysing the HFR of the stars in the image (half flux radius).
Essentially, the more out of focus the stars are, the lower their brightness. As the software adjusts focus, it studies this value in each image until it finds the point where the stars are at their brightest. This allows for the focus to be calculated and set automatically without any hands touching the scope. Not only does this reduce the chances of knocking the scope and affecting your polar alignment, it opens the door for automation. You can now have your system automatically pause imaging, check and adjust the focus, and resume imaging without any input. And most importantly, you get to stay warm!
