If you’re interested in capturing photos of the night sky through a telescope, one of the most important things you’ll need to learn is how to polar align your mount. In this beginner’s guide, we’ll cover the basics of polar alignment and walk you through the steps you’ll need to follow to get your telescope properly aligned.
Why is Polar Alignment important?
Polar alignment doesn’t just “help” you take better images, it’s absolutely critical to capture the long exposure images needed to photograph faint nebula and galaxies. Polar alignment is the process of aligning your telescope’s mount with the Earth’s rotational axis, allowing you to track objects in the sky with greater accuracy. In other words, you need to make sure that your mount is rotating at the same angle as the sky, and this angle changes depending on your location.
Why is it called “Polar Alignment”?
The reason we call this process “Polar alignment” is because the axis that the Earth rotates along passes straight through it’s poles. See the diagram below:
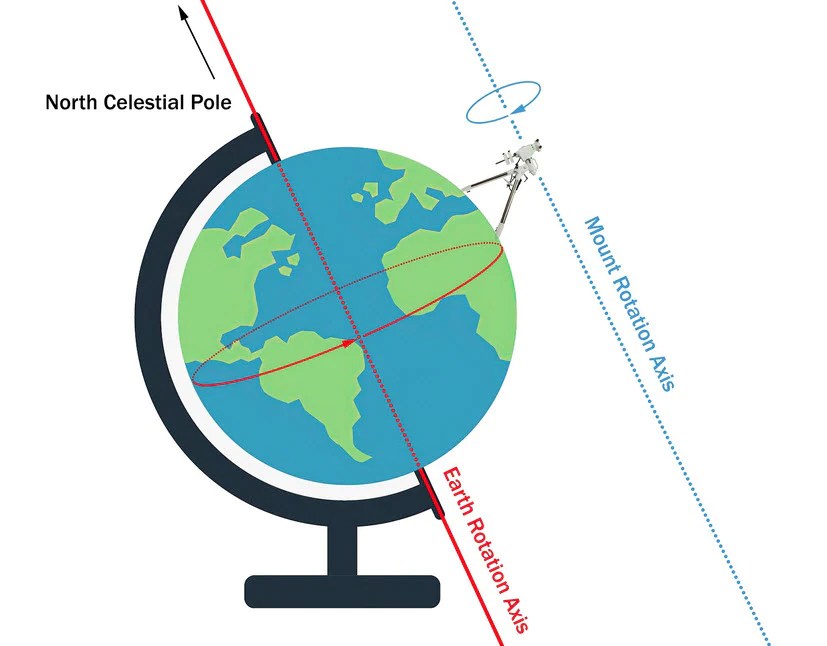
Polar Alignment Axis – Credit OPT Telescopes
By precisly adjusting the angle of the mount head, we can make sure that when it rotates, it rotates on the same axis as the Earth.
NOTE* – Many beginenrs often get confused between polar alignment and the mounts position in the sky. Polar alignment means getting the rotational axis of the mount to match the Earth. Once that’s done, the mount is still free to point anywhere in the sky – it just means that it does it on the same axis as the Earth.
Polar alignment can be very tricky for beginners. There are two methods: Manual alignment, and electronically assisted alignment. Both achieve the same goal but in very different ways. Let’s discuss this further:
Manual Alignment – The Original Method
Most equatorial mounts will come with a small lens/scope built into them – this is called the Polar Scope. When looking through them, you’ll be able to see the stars in the sky, as well as an overlay of some constellations. See the example below:

When looking through the Polar scope, you’ll see the above patterns. The aim is to use the adjustment bolts on your mount to position it so that Polaris, (the north star) sits right inside the overlaid circle.
Why Polaris?
The reason why manual alignment is done using Polaris is because Polaris just so happens to be positioned very closely to the Earth’s rotational (polar) axis. It’s important to note that Polaris is not in exact alignment with our rotation axis – it sits slightly offset. Manual polar alignment is about getting Polaris in the correct position, guided by the overlay. This will ensure your mount will be correctly aligned.
How to perform a manual alignment
Fortunately, there aren’t too many steps to perform a succesful manual alignment. I’ve tried to break this down as much as possible below:
- Once in your imaging location, position your mount and telescope so they face True North.
- Adjust your mounts latitude to match your location. My latitude us 54°, so I use the adjustment bolt on my mount and the angle scale on it’s side to set it to 54°. This will ensure Polaris will at least be in your field of view when you look through the polar scope.
- When stars become visible, look through the Polar Scope (remove the cap if necessary).
- In some mounts, you may need to rotate the declination axis 90° for the polar scope to be uncovered.
- Look at the built in constellation overlay – it will look something like the above image.
- Adjust the bolts to get Polaris into the correct position.
Assisted Polar Alignment – The Modern Way
Assisted polar alignment is perhaps one of the greatest developments for amateur astrophotographers. Using a computer, special software will tell you exactly what adjustments to make on your mount to achieve perfect polar alignment – all without ever looking through the polar scope. No more getting on your knees on cold wet grass in the middle of the night!
How does it work?
Assisted Polar alignment uses technology called Plate Solving. Plate Solving is the process of taking a photo of the sky, and having the computer calculate exactly where the mount is pointed based on the star patterns.
Computers are far better at mapping the stars and identifying patterns than humans, and so this process happens very quickly, often in seconds. Here’s how it works:
- The software tells your camera to take a photo
- The software identifies where your camera (and therefore mount) is pointed
- The software tells you which adjustments to make and by how much to get the mount correctly aligned.
The camera will keep taking photos continuously, constantly giving updated positions to the computer, and therefore, giving you continuous directions on what corrections to make – genius, right!
I use the ASIAIR Plus – an all in one mini computer purpose designed for astrophotography. The screenshot below is from the Polar Alignment function.
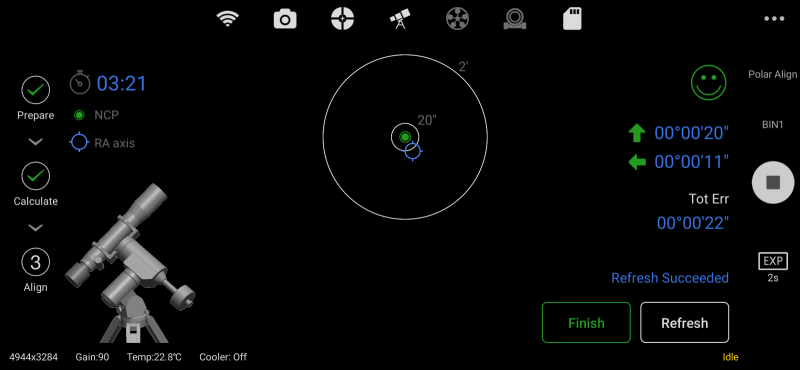
Notice the arrows on the right hand side of the image – these tell you which way the mount needs to move. The system uses your camera and telescope to continuously take photos and tell you which way to move the mount. In this case, the mount is align well enough that any errors can be corrected by the auto-guiding system – you even get a smiley face once you’re well enough aligned!
Related article: What is auto-guiding
How to perform an Assisted Polar Alignment
To perform an electronically assisted polar alignment shown above, you’ll need 3 things:
- A computer – this can be a laptop, a mini windows PC, or a purpose built system like the ZWO ASIAIR
- Polar alignment software – These include Sharpcap Pro or NINA. (The ASIAIR comes with it’s own software including a polar alignment function).
- A camera attached to your telescope
The steps to actually carry out an electronically assisted alignment will vary slightly between each type of software, but in general, they will absolutely include the following:
- Connect your camera to your computer (Or ASIAIR if that’s what you’re using). You can use your main camera or your guide camera, it’s doesn’t really matter.
- Tell your polar alignment software the focal length of the lens or telescope your camera is connected to. This is VERY important as the software will use this to help it calculate the correct position in the sky.
- The software will take an initial photo.
- The software will then ask you to rotate the mount approx 60° in the RA axis. Once you have done this, you can click “Next” and another photo will be taken.
- The software will then calculate the rotational axis between the two images and will give you on-screen guidance on how to adjust the mount.
This is the standard approach that polar alignment software suites take, and is common across Sharpcap Pro, NINA, and the ASIAIR. In the case of the ASIAIR, it actually has full control of your mount, so you won’t even have to rotate the axis maually!
